Monday, April 7, 2014

1 Year of Type 1 Diabetes :: Part 1 :: Introduction

Hi.  My name is Theresa.  I have five children.  One of them has type 1 diabetes.  His name is Aaron.  This is our story.

I confess.  I never would have read a blog post about type 1 diabetes before Aaron's diagnosis.  I didn't really know what it was.  I didn't closely know anyone else living with it.  I had no real reason to educate myself about it.  


Aaron was diagnosed one year ago, and I got educated pretty darn quick.  We have had a year of education and adjustment, and I know enough now to know that living with diabetes means learning and adjusting for the rest of your life.  Thanks to modern medicine, type 1 diabetes is treatable, and once controlled with the proper treatments, it generally will not prevent a person from living a long and full life.  But it is always present, it always presents risks, and it must always to be monitored and attended to.  In many ways it "invades" every part of the day and nearly everything that you do.  

Type 1 diabetes is most often (but not always) diagnosed in children.  It typically falls on the parents to manage their child's diabetes and to train and educate him along the way at the appropriate times.  Ultimately, he will mange his own health, but in the mean time, it is a family effort.  

That is why I decided to write this series on our first year of parenting a child with type 1 diabetes.  Because even though it is a somewhat common and (blessedly) treatable illness, it is an immensely significant part of our family's daily life.  It is for any family that has a member diagnosed with the disease.  The responsibility of caring for a diabetic child** is often confusing, frustrating, and stressful.  But after one year, it is now easier to see the patterns and the plan.  I hope that sharing some of Aaron's story and some of what we've learned over the year will help educate any who may be interested.  But most especially, I hope to reassure other families who may be at the beginning of their own first year of caring for a child with type 1 diabetes.  

** note: I have read that it is not "good manners" to refer to a person with diabetes as "a diabetic."  I agree.  And we do not ever verbally refer to Aaron that way.  However, when writing about it, it is often easier and less cumbersome to use the term, rather than to say "a child who has type 1 diabetes" over and over.  I hope you understand :)  

* * * * * *

This series will be in five parts   It was written as a way for me to look back and gather my thoughts on Aaron's diagnosis and our education and adjustment over the past year.  This was Part 1, the Introduction.  Part 2 reflects on the weeks before he was diagnosed.  Part 3 is about when we received his diagnosis.  Part 4 is "What is type 1 Diabetes."  Part 5 recalls what it was like immediately after his diagnosis and where we're at today.  

I will happily take your questions and comments throughout the series.  I am not a medical professional (had to get that disclaimer in there!).  I'm just a mother who loves her children and who lives with, and cares for, a type 1 diabetic day in and day out (and through the night, as well!)   I hope I can answer your questions based on my knowledge and experience, but if I cannot, I will tell you so and will try to point you to someplace/someone who can.

For now, here are some resources that have been invaluable to my husband and me. 

American Diabetes Association website, info on type 1


     * This book is a fabulous resource for families with diabetic children to have on hand.  It is intended to be a guide for non-primary/parent care givers such as daycare workers, teachers, coaches, grandparents, etc... But even I learned a lot from it.  And we have already passed it on to family members.  I highly recommend it!  

Sunday, April 6, 2014

Weekend Projects

Here's a quick Sunday night show and tell of my projects from this weekend - they were small, but I felt quite pleased upon their completion.   I'm so energized by craftiness and such, and I enjoy sharing it with you!  (It's better than sharing some of the other stuff I did this weekend, like hollering at folks to stop tracking mud through the kitchen ;)  

The first (and awesomest) involved lined pants.  Perhaps, like me, you have sons that are hard on their clothes.  And yet, you love them (your sons, I mean), and want them to be warm and stuff on cold days.  So you buy them lined pants.  They (the pants, I mean) are well loved and well worn until they develop a hole in the outer layer.  I'm sure you would agree, that a hole in lined pants is worse than a hole in ordinary single-layer pants.  For after the advent of the hole, you no longer have regular old warm double-layer pants, what you have is an entire leg's worth of storage space in between said layers.  Do you have any idea what you'll find in those pant legs after a boy wears lined-pants-with-hole for just one day???  Wowsa.  It's a lot of stuff.  And some of it is rather bizarre.   Grape stems, anyone?

Today I was about to trash two pairs of lined pants that had gaping holes in the knees.  If you're thinking of doing the same, stop!   Turn them into summer shorts!  Yay!  That's what I did today.  I cut the legs just above the holes, cut out the linings, and hemmed the bottoms.  Voila!  (betchya didn't know I could speak French!)   
Top left : gaping holes = pits of despair.  Bottom right: lady bug I found on the floor of my sewing room :)
photo on the right shows that I was very sloppy cutting out the linings, but I wanted it done quickly,
and it doesn't really matter what it looks like on the inside.  does it?!
My other project for the weekend was breathing a little new life into Sally's tired out wardrobe.  Meet Sally:

Sometimes she has clothes on and sometimes she doesn't
and sometimes Ruth calls her Sally Ocho, but no one really knows why...
I had a little free time to fool around with hook and yarn and made up a couple hats for the girls' baby doll.  And since Clare received a baby doll bottle for her birthday, Sally needed some bibs for feeding time.  So... I happily obliged in that regard too!  


I love small and easy weekend projects.   Projects with quick results help balance out ot other projects that are time and labor intensive, like crocheting an entire blanket...or raising children, for that matter :)

Did you do any fun projects over the weekend?  


Friday, April 4, 2014

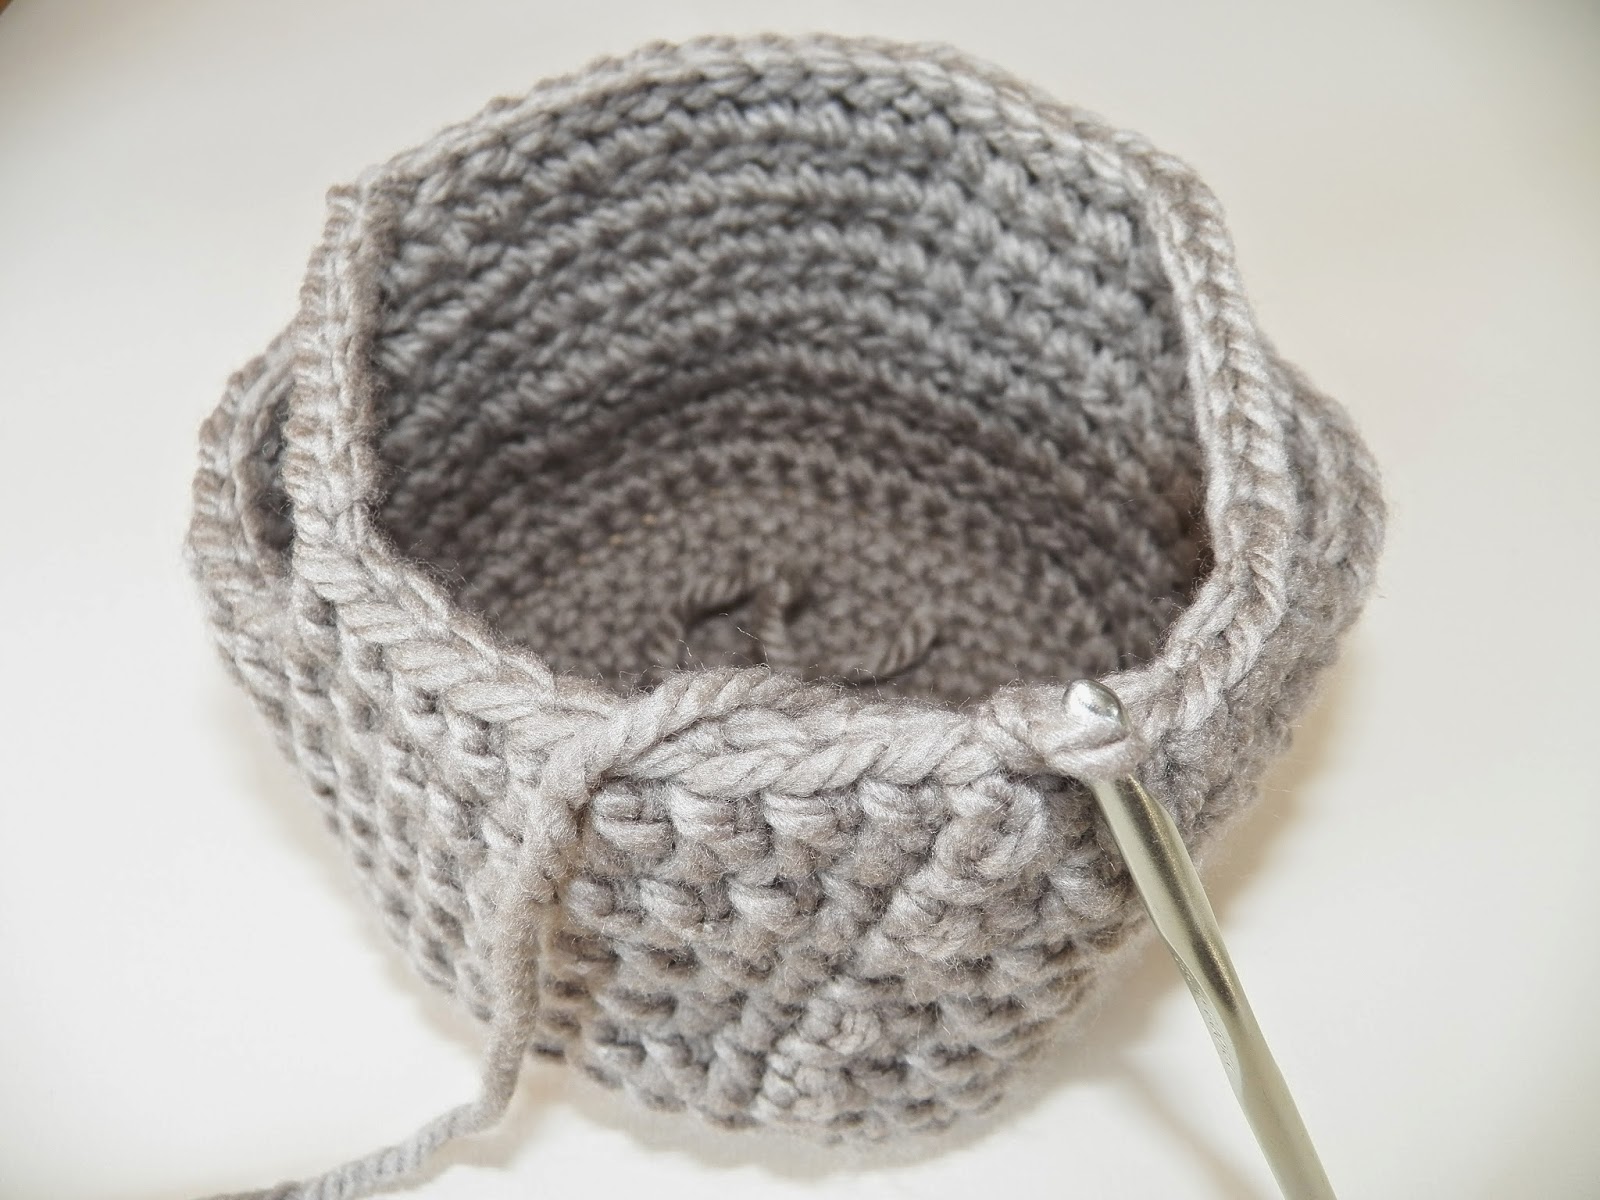
Crochet Basket Pattern


This is the first crochet pattern I have written.  If there are errors or confusing bits, please let me know.   Also, there are many patterns for crochet baskets out there.   This pattern is entirely my own, but if it resembles yours or another that you've seen, it's probably because this is how you crochet a basket, sooooo they're all going to be very similar, right?  If you choose to use my basket pattern above all the others out there in cyberspace, wow! thanks!  If you Pin it, or write or blog about it, kindly link back to here! Thank you!   

Crochet Basket Pattern with Pictures
from ordinarylovely.blogspot.com

You will need:

* super bulky weight yarn (#6), approx. 95 yards.  (For the basket pictured here I used about 3/4 of a skein of Bernat Softee Chunky in "Clay". 

* size J (6 mm) crochet hook

* stitch marker 

* tapestry needle for weaving in the ends

* embellishments if desired
(The roses in the photos were a from this simple pattern at PlanetJune.  I used a 3.75mm hook and only chained 36 to achieve a smaller flower.)

Abbreviations used:

sc - single crochet
dc - double crochet
ch - chain
sl st - slip stitch
inc - increase 

The entire basket is worked in rounds.  You will never turn your work. 
Tip: obviously, this is a flexible basket, but the tighter you crochet this, the sturdier it will be!


Rnd 1: Start with a magic ring.  Ch 1.  Work 6 sc into ring.  Pull string to close ring.
(here is a good photo tutorial on how to make a magic ring.)


Rnd 2: Work 2 sc into each stitch (12 total)


Use a stitch marker to mark the first stitch of each round.  Bottom of basket will be worked in spiral rounds with no joining stitches.  

Rnd 3: * 1 sc, inc * around (18 stitches total) 
(for the bottom of the this basket, the "inc" is working two single crochet into one stitch.)


Rnd 4: * 2 sc, inc * around (24 stitches total)

Rnd 5: * 3 sc, inc * around (30 stitches total)

Rnd 6: * 4 sc, inc * around (36 stitches total)

Rnd 7: * 5 sc, inc * around (42 stitches total)

Rnd 8: * 6 sc, inc * around (48 stitches total)


Rnd 9: (starts the sides of basket) sc into the back loop only of each stitch around (48 stitches total) 
(this is the only round in which you will crochet through just one loop.)


No need for the stitch marker anymore.  The sides of the basket will be joined.

Rnds 10 - 15  :  Ch 3, dc into next stitch and each stitch around.  Join with a sl st to the top of the beginning ch 3.  (these and all remaining stitches will be through both loops.)


Rnd 16: Ch 3, 8 dc, ch 9, skip 8 stitches, 17 dc, ch 9, skip 8 stitches, 7 dc, join with a sl st to the top of the beginning ch 3.


Rnd 17: Ch 1, sc  until you get to the chain, 12 dc onto the chain (in the space, not in the individual stitches), sc around to the next chain, 12 dc onto the chain, sc to the end, join with a sl st, finish off, weave in the end.  (For an "invisible" finish, check out this tutorial here. scroll down to "invisible finish") 


You're done!  

I like to use my baskets to carry my crochet projects around and to store my prayer books. My kids have confiscated the baskets that I've made "for myself" and have found a dozen different uses for them, including toy storage bin, purse, and ridiculous looking hat.

What will you use your basket for?!?


Thursday, April 3, 2014

The Expectation of Meteorological Changes to Come (and some camera talk)


The kids made the most of what was quite possibly the last snow of the season.  But... you really never know for sure...

You don't hear me complain about weather too much (besides the occasional grumbling brought on by oppressive humidity and outbursts of rage brought on by excessive mud.) I love living in an area where we have the privilege of experiencing all the seasons fully.  When it's winter here, it's really winter.  But without a serious winter, I suspect that we wouldn't appreciate spring as much.  Early spring finds us giddy with excitement - temperatures above 35???  Heat wave!!  Sunny, coolish warmish days,  tulip buds showing themselves, the first crocuses, the geese coming back, the local maple syrup flowing!  Blessed spring!  And just when you think you cannot stand one more spring rain, or the mud, or the never knowing if you'll need boots or sneakers, heavy coats or light jackets... The seasons change again.  Open windows, planting gardens, sunny afternoons in the sprinkler, popsicles, beach days, flipflops, splashing in the creek!  Splendid summer!  And... just when you think you cannot possibly take the humidity, or one more mosquito bite, or the bees overtaking your picnics, or the sticky mess of popsicles, or the sand in your living room rug... it's fall!!  Apples, and pumpkins, cinnamon sticks and kitchen spice candles, hot cider, cozy sweaters, gorgeous colors, and crunchy leaves, crisp air, stacking the firewood, lots and lots of baking, and  the Fall Soup Party!  Glorious autumn!  And then it drags on, and just when you can't bear the thought of lifting another rake, or mushy leaves gathering on the floor of the van, brown grass, and bare trees against gray skies... another welcome change!  The first soft snow, the excitement of the first plows on the roads, new mittens, sledding, snowmen, snowball fights and forts, seeing your breath in the air, cozy nights in front of the fire, hot chocolate, Christmas lights!  Glistening winter!  And though it seems it will never end, just when you think you've reached your breaking point and you can't possibly stand another frigid day, or shoveling the driveway, or storms and slush and ice... 


* * * * * *


And here is my one random picture from the maple sugar house we visited last weekend.  Please cover your ears because I'm going to scream here - AAAAAHHHHHHHH!!!!!  Ok.  My camera and/or batteries choose the worst times to go all tech-trippy on me.  I keep thinking about getting a new camera - a big girl dSLR camera - but then I get scared off by the price and by the thought of approaching my husband with the request and the price, and so I resign myself to using my current camera until it malfunctions AGAIN and I realize a camera can only be dropped on the floor so many times before it says, "I'm outta here."  Sooo - please give me some camera advice, like what should I get and how should I keep it away from the children who invented the drop-the-camera-on-the-floor game.  (Coincidentally, these children happen to be the same ones that live in my house...)

Wednesday, March 26, 2014

Mid-Week Musings and Mutterings...

... in no particular order because it's all just swimming around in my mid-week head...


* * * * * *

Just because it's by Beatrix Potter doesn't mean it's great.  The other night I sat by while Russ read aloud to the kids from a B.P. collection.  He was reading The Tale of Two Bad Mice.  I can, without much hesitation, say that this was one of the stupidest (sorry to use such a word, but I really think it applies here) stories I have ever heard.  The story was utterly ridiculous, but the name of one of the mice - HUNCA MUNCA (?????) was what really put it over the top.  The only thing that redeemed story time that night was that hysterical (and poorly chosen, in my opinion) name for a lady mouse.  We all cracked up every time Russ read it, and that was the only delightful thing we got out of the story - a hearty family laugh.  

Has anyone else out there read this story?  Would you care to offer a different opinion?  Or does everyone the world over think there are just a few Beatrix Potter stories that just aren't that great??

* * * * * *

My Lenten Pandora station is getting me down.  I'm trying to train it to be all Gregorian chant and early Renaissance music all the time, but no matter how many "thumbs down" I give it, IT KEEPS TRYING TO PLAY CHRISTMAS MUSIC.  I did skip several Latin classes during college, but this Catholic girl can pick up a "hodie Christus natus est" when she hears one.  

Trouble is, this morning it really did look like hodie Christus natus est.  Despite the non-liturgical-calendar-ness of it all, I let the Christmas chant play through as I sat wrapped up in a blanket watching the snow fall outside the window.  It kind of seemed to fit.

* * * * * *

In a way, I'm appreciative of the snow.  It makes me feel less weird about crocheting mittens during the first week of Spring.

one pair per kid (don't worry, there are matches for each!) and a green pair in production for my sister


(If you're looking for a mitten pattern, this one is Grrrrrreat!)

* * * * * *

The photos may be misleading.  I did not do a stitch of crocheting today.  I've been taking a couple afternoons a week to sacrifice my "Me Time" and do art with the boys (and sometimes Ruth!)  We've all really enjoyed it, and it's really paid off, as they've started doing more artwork on their own outside of the "lessons."

I've heard from a handful of moms that art is intimidating or hard to fit into their homeschool schedule.  For a time, it was something I didn't do because I couldn't do it exactly the way I wanted - the perfect art lesson in my mind.  I finally let that go and just jumped in with less-than-perfect art lessons.  I can honestly say we've all had a really fun time getting to know different artists and experimenting with different media. 

I have wanted to write about it for a while, and think I will soon, offering an overview of our 3rd quarter study of Georgia O'Keeffe.  I guess I'm wondering what readers think of this sort of thing - is it interesting, helpful, or annoying?  I've been poking around blogs and Pinterest for a while for art ideas and I'd love to start up a conversation here on art at home - if anyone's interested, that is.  Let me know!


* * * * * *


It's still a little early to call it, but Ruth might be toilet training Clare.  Today, she got Clare on the potty seat and I heard her saying things like, "Push, Clare!  Push with all your might!"  And there was a tiny success!  We'll see, but I may not have to toilet train this girl at all.  I have helpers now.  (Or maybe Ruth's just in training to be a birth coach??)

* * * * * *

We played a fun family game last weekend - can you name the baby?  It was a lot harder than Russ thought it would be.  I knew it would be tricky ;)  


The kids all had fun "remembering" what they looked like :)

* * * * * *

A final thought from 1 Thessalonians - 

And we exhort you, brethren, reprove the irregular, comfort the fainthearted, support the weak, be patient toward all men.  (5:14)

Just a reminder for myself.  Reprove the irregular, but don't be the cause of any faintheartedness in my own family members. Correct with compassion, persevere in patience with young learners, and encourage with joy!  ok?

* * * * * *

HUNCA MUNCA!

Tuesday, March 25, 2014

Hot Air Balloon Mobile :: Pattern and Tutorial


So, you want to make a hot air balloon mobile?  


(For more photos and a video of the mobile in action, 

My son loves this mobile, as do I.  Your baby is sure to love it, too!  (And I won't tell anyone if you're just making it for yourself because it's that awesome.)  
One of the fun things about this project is that it uses scrap-size fabrics and felt. I had everything I needed for it already on hand.  Dig through your scrap pile and use up your bits and pieces!

Let's get started!


(Photos included to hopefully make up for my woefully lacking descriptive instructions.)  

Here's what you'll need:

* Four printed fabrics and two coordinating colors of craft felt to go with each (a larger "main" color and a smaller "coordinating" color") (a small amount of each is sufficient!  approx. 9" x 6" pieces of each)
* white, cream, brown craft felt
* Craft thread or embroidery floss (colors that coordinate with main balloon colors, as well as white and brown)
* Approx. 2 yards of light blue grosgrain ribbon (3/8" width)
* Fabric adhesive (I used Fabri Tac)
* Misc. items: needle, straight pins, scissors, iron

* Pattern pieces (download here), cut out


(1) Attach Heat n' Bond (according to instructions on package):

* iron a 5" x 8" piece of Heat n' Bond to the wrong/back side of each piece of printed fabric

* iron a 5" x 5" piece of Heat n' Bond to each of the "coordinating" felt colors (the small pieces that are the center of each balloon)


(2) Pin Pattern Pieces and Cut:

Pattern Piece 1 - two of each "main" color felt (8 total)

* Pattern Piece 2 - two of each printed fabric with Heat n' Bond backing (8 total)

Pattern Piece 3 - two of each coordinating felt color with Heat n' Bond backing  (8 total)

* Pattern Piece 4 - four from the cream felt

* Pattern Piece 5 - four from the brown felt

* Pattern Piece 6 - fold white felt in half, cut three.  (six total)

* Cut four 12" lengths of ribbon (or whatever length you desire)


(3) "Build" the Balloons:

* according to instructions on Heat n' Bond, attach printed fabrics to the main felt colors

* attach smaller coordinating felt pieces to center of printed pieces  


(Note: if you leave the iron sitting on the craft felt for too long it will melt.  However, as you can see from the pictures, I did not have any problem using the iron on the felt pieces as long as I kept the steam off and kept the iron moving.)

* fold brown felt piece to form a square - for the "gondola," or passenger basket. Slip it up over the bottom (narrower end) of the cream felt and glue in place (use a dab of glue on front and back)

*  Lay the balloon pieces together right sides facing out. Use fabric adhesive to glue cream felt piece in between the balloons (at the bottom.)


(4) Sew balloons:

* blanket stitch or whip stitch the sides of the brown "gondolas" together using brown thread


* Using coordinating color thread, begin sewing balloons together at the base using a simple running stitch.  Stop when you reach the top, not quite to the center.  

* Glue approximately one inch of ribbon in between the balloon front and back.  Continue sewing around, being sure to pass the needle through the ribbon at the top.  

(NOTE: I tied my thread off so that the beginning and ending knots were hidden inside the two balloon pieces.)


(5) Attach clouds:

* approximately 1 - 1 1/2" above three of the balloons, glue cloud pieces to either side of the ribbon.  

* With the white thread, use a running stitch to stitch around the clouds, passing the needle through the ribbon both at the top and bottom.    


(6) Yay!  You're done!


* Determine how you will hang your mobile.  I tied knots in the tops of my ribbon and replaced the uninspired flowers that were on the mobile of my son's Graco swing.  


My daughter has asked for a similar mobile for her room.  For a mobile that will hang from the ceiling, I think I will use longer ribbon that is fed at the top through an embroidery hoop.  How will you hang your hot air balloon mobile??

Happy crafting!

** If you make a mobile from my pattern I'd love to hear about it!  If you Pin It or blog about it please link back to my original idea!  Thank you, kindly.

** Please let me know if you have any questions about the tutorial or if you have suggestions on ways I could make the instructions clearer.  


Related Posts Plugin for WordPress, Blogger...