When I was pregnant with Clare, waaaaay back in early 2012, I went through a new and unfamiliar sort of maternity nesting - the desire to paint wooden toys. It didn't go very far; the craving was satisfied with one evening of painting clothespins for a sorting activity for Ruth.
I had first seen the idea on Pinterest, from this website here. Ruth used it for a while before I took it back to satisfy my nesting urge. I needed something wooden to paint, stat.
So I painted the tops of each clothespin and we used it as a color sorting activity. (The ice cube mold is the type for making those long ice cubes cylinders for bottled drinks.)
 |
| "old version" |
Fast forward to present-day - it's Clare's absolute favorite activity. Some of the pieces have been lost and I had never been entirely happy with how it had turned out. So I decided to do a little refurb project...
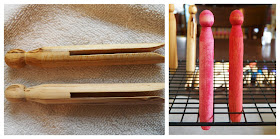
I grabbed the leftover pins from the pack I purchased last year, sanded them and then used some mineral oil on them. I had read on several different websites that using mineral oil was an inexpensive and safe way to seal wooden toys. I didn't know what mineral oil was or what it was for. So I was kind of embarrassed when I told the girl at the grocery store register that I couldn't find it and they went to get it for me.
 |
| oh brother... |
 |
| I used very fine sand paper. Thanks, Dad! |
 |
| I used a old soft kitchen towel to rub in the oil |
I stained 24 of the pins rainbow-ish colors. I used non-toxic acrylic paints, watering each down a little until I got the stain that I wanted. I wanted the colors to be vibrant, but I also wanted to be able to see the grain of the wood. (It's pretty!) I left three of the pins natural. I didn't want to dry the pins laying down and risk damaging the stain, so I dried them on a cookie rack that I propped up on either side.
After the stain dried, I oiled each pin again twice to seal them.
I'm really happy with how they turned out. I like having the entire pin colored, and I'm so happy that the grain of the wood was preserved!


Oh my goodness...SOOO cute! I may have to steal this idea!
ReplyDeleteBe my guest, Mary! I think my next project is one I'm swiping from you ;) - the painted wooden figures / barrels in a wood box toy. I've had the stuff FOREVER and now feel brave enough to try painting them!
DeleteLove the new pictures but I MISS THE PENCILS!!! Love Ya Aunt Claire
ReplyDeleteThanks, aunt Claire. I don't care for the new header and miss the pencils also, so I'm hoping I'll be able to change it again soon! Love you!
DeleteWhat a great project! So pretty and sweet. I think I am going to tuck away this idea for a nice project to do with the kids!
ReplyDeleteHope I'll get to see it when you do!
Delete